论文传送门,这篇论文是CVPR 2017的最佳论文.
resnet一文里说了,resnet是具有里程碑意义的.densenet就是受resnet的启发提出的模型.
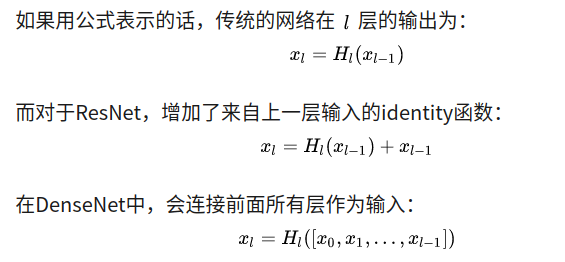
resnet中是把差别层的feature map相应元素的值直接相加.而densenet是将channel维上的feature map直接concat在一起,从而实现了feature的复用.如下所示:
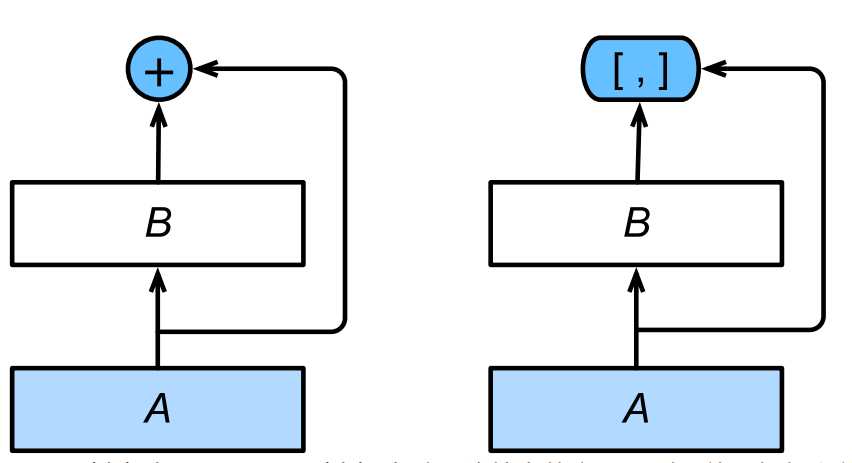
注意,是连接dense block内输出层前面所有层的输出,不是只有输出层的前一层
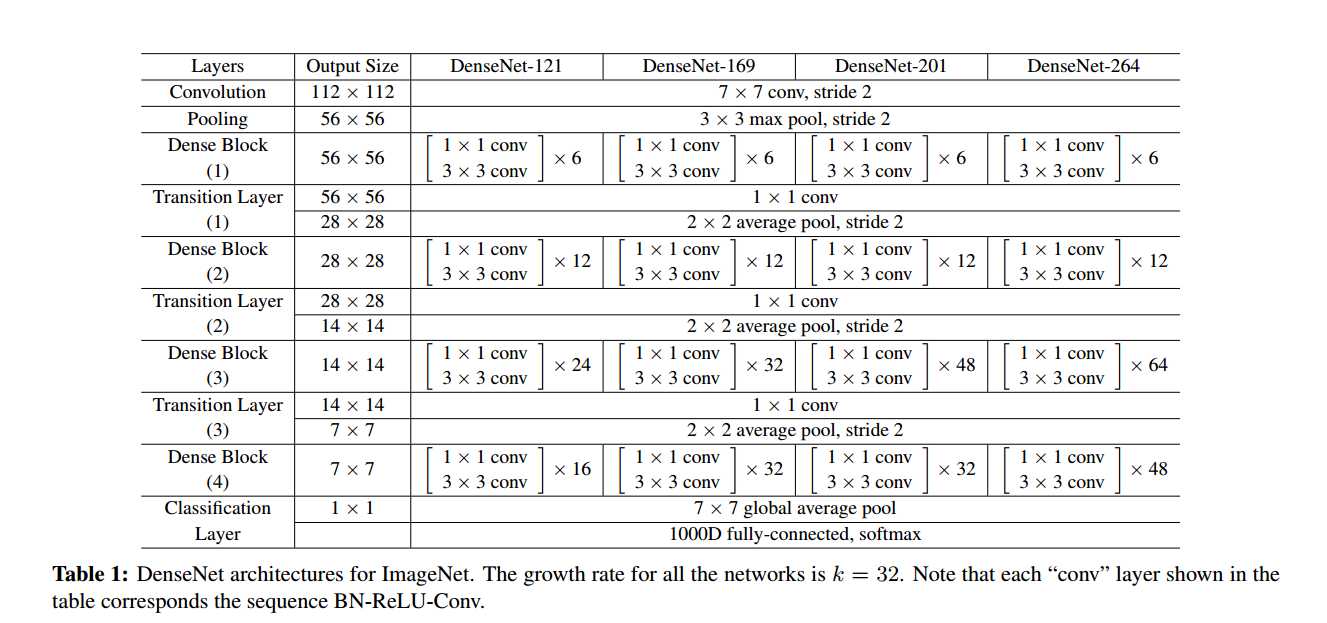
网络布局

首先实现DenseBlock
先解释几个名词
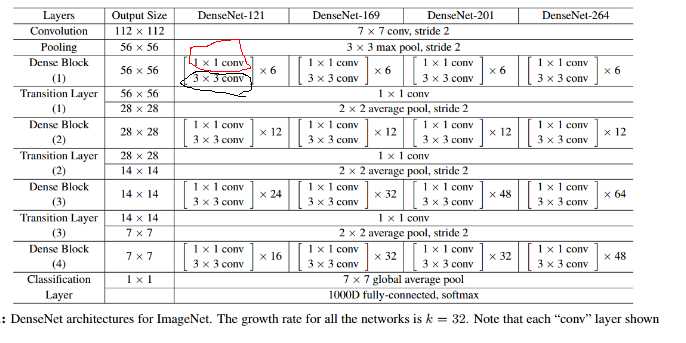
bottleneck layer
即上图中红圈的1x1卷积核.主要目的是对输入在channel维度做降维.减少运算量.
卷积核的数量为4k,k为该layer输出的feature map的数量(也就是3x3卷积核的数量)
growth rate
即上图中黑圈处3x3卷积核的数量.假设3x3卷积核的数量为k,则每个这种3x3卷积后,都得到一个channel=k的输出.假如一个denseblock有m组这种布局,输入的channel为n的话,则做完一次连接操纵后得到的输出的channel为n + k + k +...+k = n+m*k.所以又叫做growth rate.
conv
论文里的conv指的是BN-ReLU-Conv
实现DenseBlock
DenseLayer
class DenseLayer(nn.Module):
def __init__(self,in_channels,bottleneck_size,growth_rate):
super(DenseLayer,self).__init__()
count_of_1x1 = bottleneck_size
self.bn1 = nn.BatchNorm2d(in_channels)
self.relu1 = nn.ReLU(inplace=True)
self.conv1x1 = nn.Conv2d(in_channels,count_of_1x1,kernel_size=1)
self.bn2 = nn.BatchNorm2d(count_of_1x1)
self.relu2 = nn.ReLU(inplace=True)
self.conv3x3 = nn.Conv2d(count_of_1x1,growth_rate,kernel_size=3,padding=1)
def forward(self,*prev_features):
# for f in prev_features:
#
print(f.shape)
input = torch.cat(prev_features,dim=1)
# print(input.device,input.shape)
# for param in self.bn1.parameters():
#
print(param.device)
# print(list())
bottleneck_output = self.conv1x1(self.relu1(self.bn1(input)))
out = self.conv3x3(self.relu2(self.bn2(bottleneck_output)))
return out
首先是1x1卷积,然后是3x3卷积.3x3卷积核的数量即growth_rate,bottleneck_size即1x1卷积核数量.论文里是bottleneck_size=4xgrowth_rate的关系. 注意forward函数的实现
def forward(self,*prev_features):
# for f in prev_features:
#
print(f.shape)
input = torch.cat(prev_features,dim=1)
# print(input.device,input.shape)
# for param in self.bn1.parameters():
#
print(param.device)
# print(list())
bottleneck_output = self.conv1x1(self.relu1(self.bn1(input)))
out = self.conv3x3(self.relu2(self.bn2(bottleneck_output)))
return out
我们传进来的是一个元祖,其含义是[block的输入,layer1输出,layer2输出,...].前面说过了,一个dense block内的每一个layer的输入是前面所有layer的输出和该block的输入在channel维度上的连接.这样就使得差别layer的feature map得到了丰裕的操作.
tips:
函数参数带*暗示可以传入任意多的参数,这些参数被组织成元祖的形式,好比
## var-positional parameter
## 界说的时候,,我们需要添加单个星号作为前缀
def func(arg1, arg2, *args):
print arg1, arg2, args
## 挪用的时候,前面两个必需在前面
## 前两个参数是位置或关键字参数的形式
## 所以你可以使用这种参数的任一合法的通报要领
func("hello", "Tuple, values is:", 2, 3, 3, 4)
## Output:
## hello Tuple, values is: (2, 3, 3, 4)
## 多余的参数将自动被放入元组中供给给函数使用
## 如果你需要通报元组给函数
## 你需要在通报的过程中添加*号
## 请看下面例子中的输出差异:
func("hello", "Tuple, values is:", (2, 3, 3, 4))
## Output:
## hello Tuple, values is: ((2, 3, 3, 4),)
func("hello", "Tuple, values is:", *(2, 3, 3, 4))
## Output:
## hello Tuple, values is: (2, 3, 3, 4)
DenseBlock
class DenseBlock(nn.Module):
def __init__(self,in_channels,layer_counts,growth_rate):
super(DenseBlock,self).__init__()
self.layer_counts = layer_counts
self.layers = []
for i in range(layer_counts):
curr_input_channel = in_channels + i*growth_rate
bottleneck_size = 4*growth_rate #论文里设置的1x1卷积核是3x3卷积核的4倍.
layer = DenseLayer(curr_input_channel,bottleneck_size,growth_rate).cuda()
self.layers.append(layer)
def forward(self,init_features):
features = [init_features]
for layer in self.layers:
layer_out = layer(*features) #注意参数是*features不是features
features.append(layer_out)
return torch.cat(features, 1)

![[转]Node.js中package.json中^和~的区别](/uploads/allimg/200519/054J34453_lit.png "[转]Node.js中package.json中^和~的区别")