标签:
1. 在uniApp中App模式下使用【subNVue 原生子窗体】解决抽屉侧边栏无法覆盖map、canvas等原生组件的问题
首先创建抽屉页面drawer.nvue
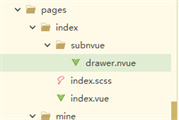
页面代码如下:
<template>
<div class="wrapper">
<!-- <list class="list-wrapper">
<cell v-for="item in lists" :key="item.id">
<div class="text-wrapper" @click="clickitem(item.id)">
<text style="font-size: 30upx; ">{{item.name}}</text>
<text class="icon"></text>
</div>
</cell>
</list> -->
<div style="flex: 1; text-align: center;">
<div class="close-drawer" @click="toMineInfo">
<text style="font-size: 34upx; text-align: center;">个人信息</text>
</div>
</div>
<div style="flex: 1; text-align: center;">
<div class="close-drawer" @click="hideDrawer">
<text style="font-size: 34upx; text-align: center;">关闭抽屉</text>
</div>
</div>
</div>
</template>
<script>
export default {
data() {
return {
lists: [],
}
},
beforeCreate() {
const domModule = weex.requireModule('dom')
domModule.addRule('fontFace', {
fontFamily: "unibtn",
'src': "url('../../../../static/uni.ttf')"
});
},
created() {
for(let i = 0; i < 5; i++){
this.lists.push({
id: i,
name: 'Item' + i,
});
}
},
methods: {
toMineInfo(){
uni.navigateTo({
url:'/pages/mine/mineInfo/mineInfo'
})
},
hideDrawer() {
uni.getCurrentSubNVue().hide('auto')
},
clickitem(e) {
uni.$emit('drawer-page', e);
}
}
}
</script>
<style scoped>
.wrapper {
flex-direction: column;
flex: 1;
text-align: center;
padding: 60upx 0upx 0upx 20upx;
background-color: #2293f7;
}
.nav-text {
color: #8f8f94;
/* #ifndef APP-PLUS-NVUE */
margin-bottom: 40px;
/* #endif */
/* #ifdef APP-PLUS-NVUE */
margin-bottom: 40upx;
/* #endif */
}
.list-wrapper {
/* #ifdef APP-PLUS-NVUE */
height: 450upx;
/* #endif */
/* #ifndef APP-PLUS-NVUE */
height: 450px;
/* #endif */
}
.text-wrapper {
justify-content: center;
border-bottom-style: solid;
border-bottom-width: 1upx;
border-bottom-color: rgba(0,0,0,.2);
margin-bottom: 35upx;
padding-bottom: 15upx;
}
.close-drawer {
background-color: #f8f8f8;
width: 300upx;
padding: 15upx;
border-radius: 20upx;
border-style: solid;
border-width: 1upx;
border-color: rgba(0,0,0,.2);
}
.icon {
position: absolute;
right: 10upx;
color: #000000;
font-family: unibtn;
font-size: 30upx;
font-weight: 400;
}
</style>
在pages.json中的配置如下:
"subPackages": [{
"root": "pages/index",
"pages": [
{
"path": "index",
"style": {
"navigationBarTitleText": "SubNvue",
"app-plus": {
"titleNView": false,
"subNVues": [{
"id": "drawer",
"path": "subnvue/drawer",
"type": "popup",
"style": {
"width": "70%",
"right":"0"
// "left":"20%"
}
}]
}
}
}
]
}
]
2. 使用【subNVue 原生子窗体】创建一个公共的导航栏
首先创建公共导航栏页面nav.nvue
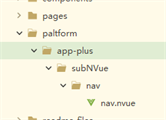
页面代码如下:
<template>
<div class="wrapper">
<div class="status-bar"></div>
<div class="nav">
<text class="back" @click="back"></text>
<text class="title">{{title}}</text>
</div>
</div>
</template>
<script>
export default {
data() {
return {
title:''
}
},
beforeCreate() {
const domModule = weex.requireModule('dom')
domModule.addRule('fontFace', {
fontFamily: "unibtn",
'src': "url('../../../../static/uni.ttf')"
});
},
created() {
let that = this;
uni.$on('setTitle', (title) => {
that.title = title;
})
},
methods: {
back() {
uni.navigateBack();
}
},
}
</script>
<style>
.wrapper {
flex: 1;
/* background-image: linear-gradient(to right, #a80077, #66ff00); */
background-image: linear-gradient(to right, #2293f7, #2293f7);
flex-direction: column;
}
.status-bar {
flex: 1;
}
.nav {
position: relative;
height: 44px;
flex: 0;
justify-content: center;
align-items: center;
}
.title {
font-size: 36upx;
}
.back {
position: absolute;
left: 3px;
color: #000000;
font-family: unibtn;
font-size: 54upx;
}
</style>
在pages.json中的配置如下:
{
"path" : "pages/mine/mineInfo/mineInfo",
"style" : {
"navigationStyle":"custom",
"app-plus":{
"subNVues":[{
"id":"nav",
"path":"paltform/app-plus/subNVue/nav/nav",
"type":"navigationBar"
}]
}
}
}
记一次subNVue 原生子窗体的使用
标签:
原文地址:https://www.cnblogs.com/fyhlz/p/11793986.html


