标签:
一、LNMP架构及应用部署
众所周知,LAMP平台时目前应用最为广泛的网站服务器架构,其中的“A”对应着web服务软件的Apache HTTP Server ,随着Nginx在工作环境中的使用越来越多,LNMP(或LEMP)架构也受到越来越多的Linux运维工程师的青睐。
就像构建LAMP平台一样,构建LNMP平台也需要Linux服务器、MySQL数据库、PHP解析环境,区别主义在于Nginx与PHP的协作配置上。
准备工作
Centos 7操作系统一台;
Windows 客户端一台;
案例所需镜像及软件包请访问:https://pan.baidu.com/s/10wFG1YQaY2FTJKgMp1x0kw
提取码:rl3i
二、构建LNMP网站平台
部署前准备
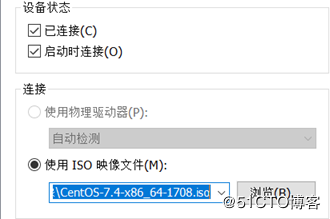
①挂载Linux光盘,,拷贝nginx依赖程序到/usr/src/目录

[[email protected] ~]# mount /dev/cdrom /mnt/
mount: /dev/sr0 写保护,将以只读方式挂载
[[email protected] ~]# cp /mnt/nginx-1.6.0.tar.gz /usr/src/
②切换LAMP光盘,将mnt目录下所有数据拷贝到/usr/src/目录
[[email protected] ~]# umount /mnt/

[[email protected] ~]# mount /dev/cdrom /mnt/
mount: /dev/sr0 写保护,将以只读方式挂载
[[email protected] ~]# cp /mnt/* /usr/src/
③切换到操作系统光盘
[[email protected] ~]# umount /mnt/
[[email protected] ~]# mount /dev/cdrom /mnt/
mount: /dev/sr0 写保护,将以只读方式挂载
1、部署Nginx静态网站
Nginx具体配置及概述请访问博客:Centos 7部署Nginx网站服务
[[email protected] ~]# rm -rf /etc/yum.repos.d/CentOS-*
<!--清除系统自带yum源 -->
[[email protected] ~]# yum -y install pcre-devel zlib-devel
<!--安装Nginx的依赖程序-->
[[email protected] ~]# useradd -M -s /sbin/nologin nginx
<!--创建管理Nginx的用户-->
[[email protected] ~]# tar zxvf /usr/src/nginx-1.6.0.tar.gz -C /usr/src/
<!--解压缩Nginx软件包-->
[[email protected] ~]# cd /usr/src/nginx-1.6.0/
[[email protected] nginx-1.6.0]# ./configure --prefix=http://www.mamicode.com/usr/local/nginx --user=nginx --group=nginx --with-http_stub_status_module
<!--配置Nginx-->
[[email protected] nginx-1.6.0]# make && make install <!--编译安装Nginx-->
[[email protected] ~]# ln -s /usr/local/nginx/sbin/* /usr/local/sbin/ <!--优化Nginx执行命令-->
[[email protected] ~]# cp /usr/local/nginx/conf/nginx.conf /usr/local/nginx/conf/nginx.conf.bak
<!--备份主配置文件-->
[[email protected] ~]# vim /usr/local/nginx/conf/nginx.conf<!--编辑主配置文件-->
3 user nginx;
4 worker_processes 1;
6 error_log logs/error.log;
12 pid
logs/nginx.pid;
16
use epoll;
17
worker_connections 1024;
29
#access_log logs/access.log main;
31
sendfile
on;
35
keepalive_timeout 65;
39
server {
40
listen
80;
41
server_name localhost;
44
charset utf-8;
48
location / {
49
root html;
50
index index.html index.htm;
51
}
84
}
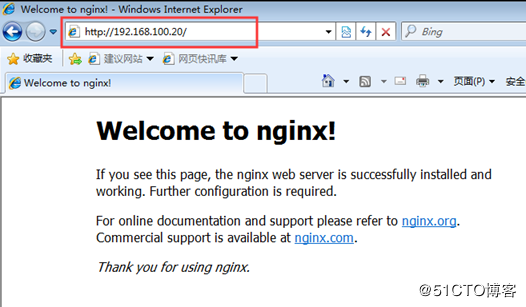
[[email protected] ~]# nginx <!--启动Nginx服务-->
[[email protected] ~]# netstat -anptu | grep nginx <!--监听Nginx服务-->
tcp
0
0 0.0.0.0:80
0.0.0.0:*
LISTEN
4663/nginx: master
[[email protected] ~]# vim /etc/init.d/nginx <!--编写Nginx服务管理脚本-->
#!/bin/bash
#chkconfig: 35 90 30
#description:nginx server
PROG="/usr/local/nginx/sbin/nginx"
PIDF="/usr/local/nginx/logs/nginx.pid"
case "$1" in
start)
$PROG
;;
stop)
kill -s QUIT $(cat $PIDF)
;;
restart)
$0 stop
$0 start
;;
reload)
kill 0s HUP $(cat $PIDF)
;;
*)
echo "Usage:$0 (start|stop|restart|reload)"
exit 1
esac
exit 0
[[email protected] ~]# chmod +x /etc/init.d/nginx<!--添加脚本执行权限-->
[[email protected] ~]# chkconfig --add nginx <!--添加系统服务-->
[[email protected] ~]# chkconfig --level 35 nginx on <!--设置开机自动启动-->
[[email protected] ~]# /etc/init.d/nginx stop<!--脚本停止Nginx服务-->
[[email protected] ~]# /etc/init.d/nginx start<!--脚本启动Nginx服务-->
[[email protected] ~]# /etc/init.d/nginx restart <!--脚本重启Nginx服务-->
至此,可以配置客户端配置与服务器同网卡、同网段的IP地址及网关,访问Nginx网站
2、部署基于域名的虚拟主机
[[email protected] ~]# yum -y install bind bind-chroot bind-utils <!--安装DNS-->
[[email protected] ~]# echo "" > /etc/named.conf
<!--清空主配置文件-->
[[email protected] ~]# vim /etc/named.conf
<!--修改主配置文件-->
options {
listen-on port 53 { 192.168.100.20; };
directory "/var/named";
}
zone "benet.com"
IN
{
type master;
file "benet.com.zone";
}
zone "accp.com"
IN
{
type master;
file "accp.com.zone";
}
[[email protected] ~]# named-checkconf -z /etc/named.conf
<!--检查主配置文件是否配置错误-->
[[email protected] ~]# vim /var/named/benet.com.zone
<!--配置benet.com的正向解析区域-->
$TTL 86400
@
SOA
benet.com.
root.benet.com(
2019112801
1H
15M
1W
1D
)
@
NS
centos02.benet.com.
centos02 A
192.168.100.20
www
A
192.168.100.20
[[email protected] ~]# chmod +x /var/named/benet.com.zone
<!--正向解析区域配置文件添加执行权限-->
[[email protected] ~]# chown named:named /var/named/benet.com.zone
<!--修改属主属组-->
[[email protected] ~]# named-checkzone benet.com /var/named/benet.com.zone
<!--检查benet.com正向解析区域配置文件是否错误-->
zone benet.com/IN: loaded serial 2019112801
OK
[[email protected] ~]# cp /var/named/benet.com.zone /var/named/accp.com.zone
<!--复制benet.com正向解析区域到accp.com正向解析区域-->
[[email protected] ~]# vim /var/named/accp.com.zone
<!--修改accp.com正向解析区域配置文件-->
$TTL 86400
@
SOA
accp.com.
root.accp.com(
2019112801
1H
15M
1W
1D
)
@
NS
centos02.accp.com.
centos02 A
192.168.100.20
www
A
192.168.100.20
[[email protected] ~]# named-checkzone accp.com /var/named/accp.com.zone
<!--检查accp.com正向解析区域配置文件是否错误-->
[[email protected] ~]# vim /etc/sysconfig/network-scripts/ifcfg-ens32<!--编辑网卡添加主DNS-->
DNS1=192.168.100.20 <!--添加DNS-->
[[email protected] ~]# systemctl restart network
<!--重启网卡服务-->
[[email protected] ~]# systemctl start named
<!--启动DNS服务器-->
[[email protected] ~]# systemctl enable named <!--设置开机自动启动-->
[[email protected] ~]# nslookup
<!--解析域名测试是否正常-->
Server:
192.168.100.20
Address: 192.168.100.20#53
Name:
Address: 192.168.100.20
[[email protected] ~]# nslookup <!--解析域名测试是否正常-->
Server:
192.168.100.20
Address: 192.168.100.20#53
Name:
Address: 192.168.100.20
[[email protected] ~]# mkdir -p /var/www/benetcom
<!--创建虚拟主机网站根目录-->
[[email protected] ~]# mkdir -p /var/www/accpcom
<!--创建虚拟主机网站根目录-->
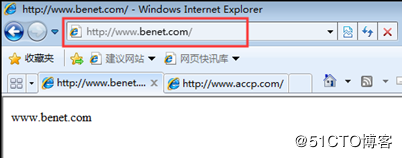
[[email protected] ~]# echo "www.benet.com" > /var/www/benetcom/index.html
<!--创建虚拟主机的网站主页-->
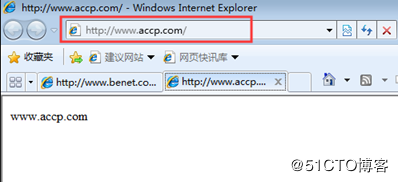
[[email protected] ~]# echo "www.accp.com" > /var/www/accpcom/index.html
<!--创建虚拟主机的网站主页-->
[[email protected] ~]# vim /usr/local/nginx/conf/nginx.conf <!--修改Nginx主配置文件支持虚拟主机-->
server {
listen :80;
server_name ;
charset utf-8;
access_log
logs/www.benet.com.access.log;
error_log
logs/www.benet.com.error.log;
location / {
root /var/www/benetcom/;
index index.html;
}
}
server {
listen :80;
server_name ;
charset utf-8;
access_log
logs/www.accp.com.access.log;
error_log
logs/www.accp.com.error.log;
location / {
root /var/www/accpcom/;
index index.html;
}
}
[[email protected] ~]# nginx -t
<!--检查Nginx是否配置错误-->
nginx: the configuration file /usr/local/nginx/conf/nginx.conf syntax is ok
nginx: configuration file /usr/local/nginx/conf/nginx.conf test is successful
[[email protected] ~]# systemctl restart named
<!--重新启动DNS服务-->
[[email protected] ~]# /etc/init.d/nginx restart
<!--重新启动Nginx服务-->
至此客户端添加DNS地址,访问域名即可
3、部署MySQL数据库

![[转]Node.js中package.json中^和~的区别](/uploads/allimg/200519/054J34453_lit.png "[转]Node.js中package.json中^和~的区别")